
UniSlot Electric Knife Sharpener


Fewer Steps and Less Effort.


See the Light. Feel Control.
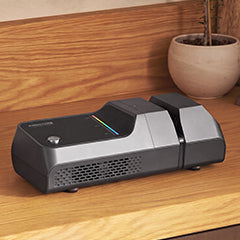
A Little Guidance Goes a Long Way.
- Blue Light — Too Little Pressure
- Yellow-Green Light — Just Right
- Red Light — Too Much Pressure

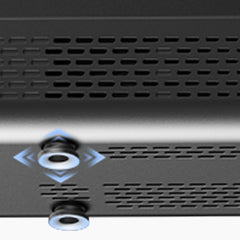
One Sharpener. Three Angles.

20° — Precision Knives

30° — Everyday Kitchen Knives

45° — Heavy-Duty Knives

A smarter way to sharpen, designed with your blade's finish in mind.

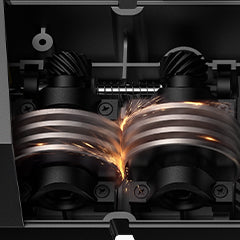
Precision Sharpening.
Longer-lasting sharpness with consistent sharpening performance.

Sharpen More. Clean Up Less.
Built-in magnets help collect metal shavings around the wheels, keeping sharpening tidier and cleanup easier.
*Do Not Clean with Water. Keep Away from Water*


UniSlot Electric Knife Sharpener
A sharp knife makes all the difference in the kitchen. With KINGSTONE UniSlot, keeping your knives ready for everyday cooking is easier than ever. Spend less time worrying about dull blades and more time enjoying effortless food preparation, from everyday slicing to preparing meals for family and friends.
Key Features:
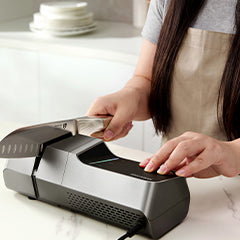
- One Slot. Every Step.: No need to switch between multiple slots or complicated sharpening stages. Enjoy a simpler, more convenient sharpening experience.
- See the Light. Feel Control.: No more guessing how much pressure to apply. Get clear visual guidance for more controlled sharpening.
- One Sharpener. Three Angles.: No need for multiple sharpeners to handle different sharpening needs. Choose the angle that works for your knives.
- Less Friction. Less Scratching.: Reduce friction during sharpening and help protect your knife blades from unwanted scratches.
-
Sharpen More. Clean Up Less.: Less mess around your workspace. The built-in magnet helps collect metal shavings for easier cleanup.

Free Shipping

90-Day Returns

1-Year Warranty

Why Choose KINGSTONE?
“We believe keeping kitchen knives sharp shouldn't be complicated. Too many sharpening steps and concerns about damaging the blade can make a simple task feel like a chore. That's why we created the UniSlot Electric Knife Sharpener — bringing simplicity, control, and convenience together in one thoughtful design.”
——Bill Cai
KINGSTONE Founder

UniSlot Specifications
Product Model: 2508-48
Rated Voltage: 110V-240V / 50Hz-60Hz
Rated Power: 70W
Dimensions: 258 x 108 x 85mm (10.2 x 4.3 x 3.3 inches)
Net Weight: 3.5 lbs (1.6 kg)
Sharpening Angles: Adjustable and fixed. Fixed angles: 20°, 30°, and 45°.
FAQ
Simply slide the angle selector to choose from three settings: 20°, 30°, or 45°.
As a general guide, the 20° setting is suitable for smaller kitchen knives, such as paring knives; 30° works well for most chef's knives and Santoku knives; and 45° is designed for compatible cleavers and choppers. Always check your knife manufacturer's recommended sharpening angle before use.
The sharpener is designed for most household metal kitchen knives, including paring knives, chef's knives, slicing knives, utility knives, and compatible Chinese cleavers.
It is not suitable for scissors, ceramic knives, serrated knives, coated knives, or non-knife items such as screwdrivers and keys.
Follow these simple steps:
Select the appropriate sharpening angle for your knife.
Turn on the sharpener. The LED indicator will turn blue in standby mode
.Place the blade vertically in the slot, keeping it properly aligned with both abrasive wheels. Pull the knife in one direction, from heel to tip, at a slow, steady, and consistent speed. Each pass should take approximately 2–3 seconds. Avoid tilting the blade or moving it back and forth.
The single-slot design sharpens both sides of the blade simultaneously, so there is no need to sharpen each side separately.
For very dull blades, additional passes may be needed. For routine touch-ups, just a few passes are generally sufficient. Check the blade's sharpness as you go and avoid unnecessary sharpening.
The sharpener features a removable magnetic cover that helps collect metal shavings during sharpening and keeps them from scattering across your countertop.
Simply remove the cover after use and empty the collected debris. Cleanup is quick and easy.
Yes. The sharpening wheel set is detachable and can be replaced. If you notice obvious signs of wear, such as reduced sharpening efficiency or difficulty sharpening the blade, replace the wheel set with an original Kingstone replacement part. Follow these steps:
Step 1: Before replacing the grinding wheel, ensure the power is off. Use a Phillips screwdriver to take out the push cover fixing screws according to the label instructions, then open the push cover.
Step 2: After opening the push cover, use a Phillips screwdriver to take out the 8 countersunk Phillips screws that fix the grinding wheel set.
Step 3: Then take out the 4 fixed bearing covers, take out the old grinding wheel set and replace it with a new original grinding wheel set (note to distinguish the left and right grinding wheel sets).
Step 4: After replacing with a new grinding wheel set, put the 4 bearing covers back in place according to the previous disassembly and assembly steps, then assemble the countersunk Phillips screws back in place with a Phillips screwdriver, and close the push cover after fixing the grinding wheel set and bearing covers.
Step 5: Turn on the power and test whether the device can run normally.
Always turn off the sharpener and unplug it before cleaning. Use a small cleaning brush or a dry cloth to remove metal shavings and debris from the sharpening slot.
You can remove the magnetic cover to dispose of collected metal particles more easily. Wipe the exterior with a dry cloth. NEVER rinse the unit under running water or immerse it in water.

